2017.08.21

I’ve been writing a lot of html and css lately. I already used web-mode which provides highlighting and indentation for html, css, and javascript files in Emacs. Recently I come accross Emmet. It’s not officially supported in Emacs, (well, most web developers use Sublime, I guess) but there is a package for Emmet in Emacs. Here’s the detail of my current web development settings in Emacs.

Installed packages

  • web-mode: highlighting, indentation, closing tags, jumping tags, commenting
  • company-web: completion of keywords as you type
  • yasnippet: shortcut to write a snippet
  • emmet-mode: smarter yasnippet

(add-to-list 'auto-mode-alist '("\\.ts\\'" . web-mode))
(add-to-list 'auto-mode-alist '("\\.html?\\'" . web-mode))
(add-to-list 'auto-mode-alist '("\\.css?\\'" . web-mode))
(add-to-list 'auto-mode-alist '("\\.js\\'" . web-mode))
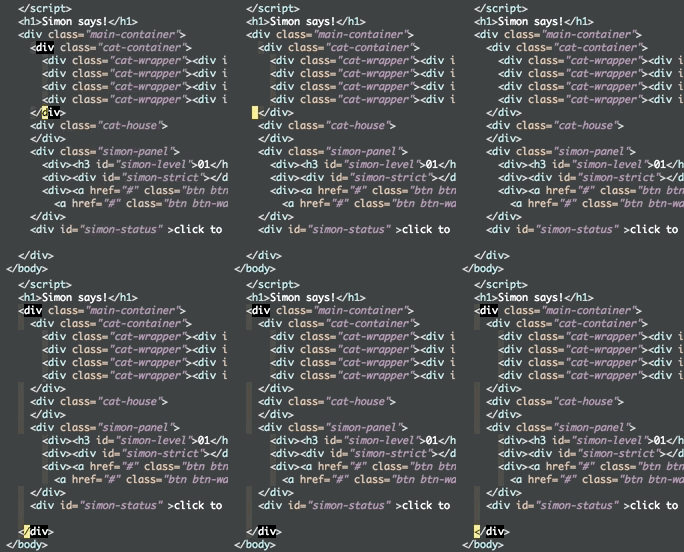
When opening an html file, it will show Web on the emacs mode line.

Set indentations

Hook is executed when the mode is turned on. Here I set the indentations (I prefer indentation size of 2 spaces).

(defun my-web-mode-hook ()
  "Hooks for Web mode."
  (setq web-mode-markup-indent-offset 2)
  (setq web-mode-code-indent-offset 2)
  (setq web-mode-css-indent-offset 2)
)
(add-hook 'web-mode-hook  'my-web-mode-hook)    
(setq tab-width 2)

Highlight of columns

I think this is neat!

(setq web-mode-enable-current-column-highlight t)
(setq web-mode-enable-current-element-highlight t)
Company settings

Set the company completion vocabulary to css and html when in web-mode. This is combined into the indentations setting above.

(defun my-web-mode-hook ()
  (set (make-local-variable 'company-backends) '(company-css company-web-html company-yasnippet company-files))
)
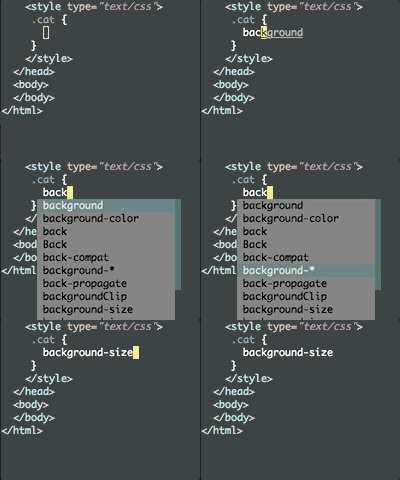
The completion will show after some delay

Emmet settings

Turn on Emmet in web-mode.

(add-hook 'web-mode-hook  'emmet-mode) 

Web-mode is able to switch modes into css (style tags) or js (script tags) in an html file. For Emmet to switch between html and css properly in the same document, this hook is added.

(add-hook 'web-mode-before-auto-complete-hooks
    '(lambda ()
     (let ((web-mode-cur-language
  	    (web-mode-language-at-pos)))
               (if (string= web-mode-cur-language "php")
    	   (yas-activate-extra-mode 'php-mode)
      	 (yas-deactivate-extra-mode 'php-mode))
               (if (string= web-mode-cur-language "css")
    	   (setq emmet-use-css-transform t)
      	 (setq emmet-use-css-transform nil)))))
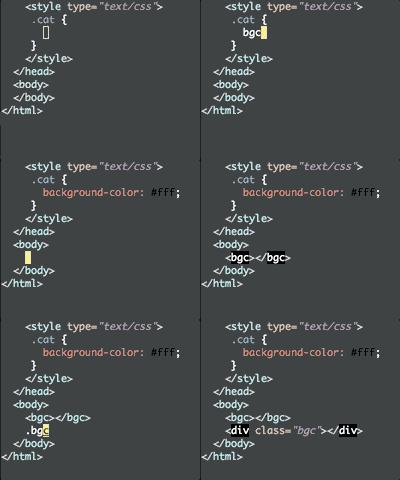
Emmet expands the bgc as background-color in style, and as a tag in html.
2017.06.15

xdotool is a command line tool used to emulate mouse and keyboard. The version on macport is too old so it doesn’t compile on Mac OS Sierra (last update was 2011).

xkbcommon

  1. Clone libxkbcommon. This is required to compile xdotool.
    #include <xkbcommon/xkbcommon.h>
    
  2. To use autogen.sh, it requires xorg-macros 1.16.
    sudo port install xorg-util-macros
    
  3. When I first try to run make, this error comes up.
    YACC     src/xkbcomp/parser.c
    /Users/fransiska/Git/libxkbcommon/src/xkbcomp/parser.y:220.5-9: syntax error, unexpected type, expecting string or identifier
    

    The cause is that bison version is too old. Mac comes with the version 2.3. So we need to replace it.

    sudo port install bison
    cd /usr/bin/
    sudo mv bison bison-2.3
    sudo ln -s /opt/local/bin/bison bison
    
  4. Compile libxkbcommon.
    ./autogen.sh --enable-shared
    make
    

xdotool

  1. Clone xdotool.
  2. Fix Makefile to include the newly compiled libxkbcommon.
    DEFAULT_LIBS=-L/usr/X11R6/lib -L/usr/local/lib -lX11 -lXtst -lXinerama -lxkbcommon -L/Users/fransiska/Git/libxkbcommon/.libs
    DEFAULT_INC=-I/usr/X11R6/include -I/usr/local/include -I/Users/fransiska/Git/libxkbcommon
    

    I cloned the repository into /Users/fransiska/Git/libxkbcommon.

  3. Compile it.
    make
    sudo make install
    
  4. Link also the library for libxkbcommon (xdotool asks it).
    cd /usr/local/lib/
    sudo ln -s /Users/fransiska/Git/libxkbcommon/.libs/libxkbcommon*dylib .
    sudo ln -s /Users/fransiska/Git/libxkbcommon/.libs/libxkbcommon*a .
    
  5. Now that it launches, when you try to send commands, this error shows up.
    Error: XTEST extension unavailable on '(null)'.
    

    You need to enable it.

    defaults write org.x.X11 enable_test_extensions -boolean true
    defaults write org.macosforge.xquartz.X11 enable_test_extensions -bool yes
    
  6. Restart XQuarts. Unfortunately, this only works on X terminals, so you can only test it on the xterm. One alternative to this for Mac OS is cliclick.
2017.06.14

I wanted to combine some PDFs, but apparently pdftk is not compilable on Mac OS Sierra.

Error: pdftk currently does not build on OS X 10.11 or greater.
Error: See https://trac.macports.org/ticket/48528
Error: Failed to fetch pdftk: incompatible OS X version

But this trick works.

/System/Library/Automator/Combine PDF Pages.action/Contents/Resources/join.py -o combined.pdf 1.pdf 2.pdf
2017.06.07

In XCode, start with File-New-Project: Game. This will create a demo project, but we will delete most of it. Delete GameScene.sks and Actions.sks. Since the Spaceship image is included in the Assets, we will just use it. Move the Spaceship image to the 2x box. We will deal with GameViewController.swift and GameScene.swift only.

GameViewController.swift

This is all we have for the GameViewController class in GameViewController.swift This sets up the Sprite Kit View, show the frame counts, hides status bar.

class GameViewController: UIViewController {

    override func viewDidLoad() {
        super.viewDidLoad()
        
        let scene = GameScene(size: view.bounds.size)
        scene .scaleMode = .resizeFill
        
        let skView = view as! SKView
        skView.showsFPS = true
        skView.ignoresSiblingOrder = true
        skView.presentScene(scene)
    }
    
    override var prefersStatusBarHidden: Bool {
        return true
    }
}

GameScene.swift

Initializing SKScene

Delete all the content of GameScene class. First we want to define the sprite and motion manager to read the accelerometer.

let player = SKSpriteNode(imageNamed: "Spaceship")
let motionManager = CMMotionManager()

We also want to define the variables which stores the x and y position of the sprite. It is of type CGFloat, because that’s the type that’s used to update the position of the sprite, not Int or Double.

var posx:CGFloat = 0
var posy:CGFloat = 0

To put on the sprite on the screen, we call addChild in didMove. We also specify the initial position of the sprite. This is called (once) when the scene is presented into the SKView.

override func didMove(to view: SKView) {
    backgroundColor = SKColor.black
    posx = size.width/2
    posy = size.height/2
    player.position = CGPoint(x: posx, y: posy)
    addChild(player)
}

Handling accelerometer updates

In the same function, we want to connect the data updates from the motion manager to a function which crunches it. We need to check if the device has accelerometer. We then ask the motion manager to start sending the updates and put it in a queue. The updates are put into the deviceMotion variable. If there is no error, the updates will trigger the function handleDeviceMotionUpdate, which we define below.

if motionManager.isDeviceMotionAvailable {
    motionManager.startDeviceMotionUpdates(to: OperationQueue.current!, withHandler: {
        (deviceMotion, error) -> Void in
        if(error == nil) {
            self.handleDeviceMotionUpdate(deviceMotion: deviceMotion!)
        }
    })
}

This function below will be called each time there is an update in the accelerometer values. It receives the deviceMotion. The roll, pitch, yaw values can be accessed by deviceMotion.attitude.roll and so on.

//handle accelerometer values updates
func handleDeviceMotionUpdate(deviceMotion:CMDeviceMotion) {
    let attitude = deviceMotion.attitude
    //saves attitude.roll as roll, etc.
    movePlayer(roll: roll, pitch: pitch)
}

Another function handles how we want to move the sprite. After updating the positions, we finally set the position of the sprite by setting its position to a CGPoint(x: Double, y:Double).

func movePlayer(roll: Double, pitch: Double) {
     if(roll < 0) {
         posx -= 5
     }
     //do more position updates

     //sets the sprite position
     player.position = CGPoint(x: posx, y: posy)
}

That’s it! The sprite will be refreshed accordingly in the new frame! I put the whole project in my git.

source: forestgiant and ioscreator

2017.06.06

It is really easy to add TeX in HTML. I use MathJax.

  1. Define the string that indicate the TeX block. Add this in the <head>. This is not needed in Jekyll, since the kramdown Markdown parser handles it.
     <script type="text/x-mathjax-config">
       MathJax.Hub.Config({
       tex2jax: {inlineMath: [ ['$','$'], ['\\(','\\)'] ]}
       });
     </script>
    
  2. Add in <head> the .js that converts these blocks. I add this in _includes/themes/bootstrap-3/default.html in my Jekyll Bootstrap installation (with Bootstrap 3 theme used).
    <script type="text/javascript" async
       src="https://cdnjs.cloudflare.com/ajax/libs/mathjax/2.7.1/MathJax.js?config=TeX-MML-AM_CHTML">
    </script>
    
  3. Add your TeX block in your .html or .md.
    $$a_1$$ \\(a_2\\)
    

    Will show as \(a_1\) \(a_2\).